
|
How to collect a Polyline feature |
|
When a polyline is being captured, the Open Polyline
The Open Polyline icon
■ Close an open polyline; ■ Switch to Discrete or Switch to Continuous. A discrete polyline means that vertices are added manually in the line (with the Add Vertex icon). A continuous polyline means that vertices are added automatically according to your the Auto-Vertex setting (every few seconds or few meters); ■ Go to the polyline Properties to edit the polyline attributes; ■ Auto-vertex is useful for continuous polyline. It allows to add vertices automatically according to a predefined number of seconds or meters (can also be defined with File > Preferences > Tagging page, Auto-vertex...); ■ The Vertex section allows you to nested a feature into your polyline. Refer to article How to collect a nested point feature for more details.
The Add Vertex icon
■ A polyline vertex can be a simple GNSS point (simple vertex) you want to add into your polyline (not a feature). It is useful to add vertices into a discrete polyline. ■ A vertex can also be a point feature (nested feature). Refer to article How to collect a nested point feature for more details. |
|
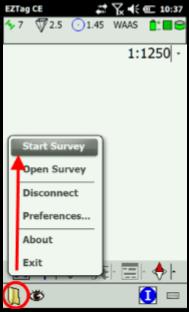
Before you collect polyline feature (line or polygon), you must Start a Survey with File > Start Survey. Once a survey is started, the GNSS Survey Toolbar is displayed and allows to record GIS features. |
|
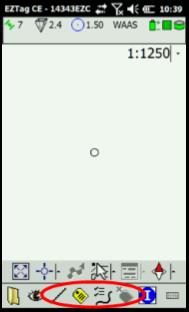
The first icon (
|
|
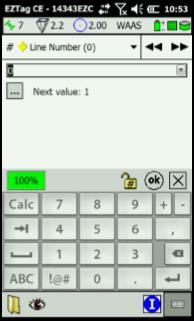
You can navigate trough the feature’s attributes with the dropdown list The first attribute When entering an attribute, you can define it as the new default value by clicking on Once all Attributes have been entered, click on
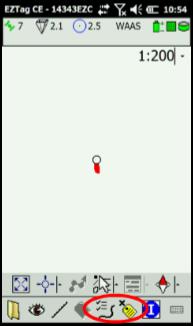
The polyline will be displayed in the Plan View. It will be red when under construction and will be displayed in black once it is completed (closed). |
|
For more details on features and attributes, refer to articles Default data dictionary and Use a custom data dictionary. |
|
Article: 000073 Related Products: EZTag CE Last Update: 2017-04-04 21:21:03 |
|
Document information |
|
|