
|
Exporting data to GIS formats |
|
Prior to exporting your data, you must copy it to your computer (refer to article Transferring data from the Field Device to the PC).
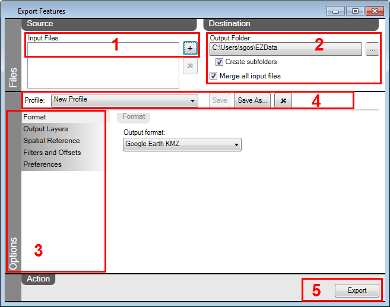
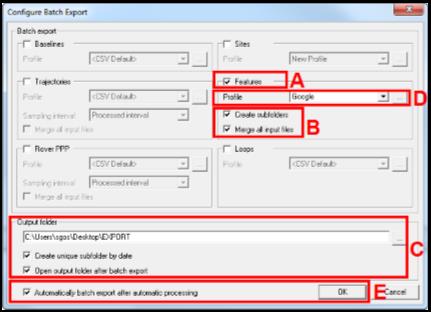
You can export your files to a GIS compatible format with Export Features. ■ If you do not post-process your data, you can access Export Features with OnPOZ Tools > Export Features. ■ If you post-process your data with EZSurv, once your post-processing is done and saved, you can access Export Features with EZSurv > Tools > Export > Export Features. ■ If you post-process your data with EZSurv, you can also add the features export to the automated post-processing steps performed with Tools > Process Auto… To configure the features export to be performed automatically after post-processing, it must be configured with Tools > Export > Configure Batch Export. |
|
1. Step 1: click on 2. Step 2: click on |
|
3. Step 3 and D: set Options for your export. If you configure the export with Configure Batch Export click on a. Select the output Format; b. Select the Output Layers; c. Select the output Spatial Reference; d. Select your output Preferences. Filter options and output metadata are defined by your Preferences. 4. You can save all the Options you’ve selected under a Profile name with 5. Click on |
|
Export Features Configure Batch Export |
|
Article: 000077 Related Products: EZField, EZSurv, EZTag CE, OnPOZ Tools Last Update: 2016-12-01 16:55:11 |
|
Document information |
|
|