
|
Convert your shapefile into the Web Mercator format |
|
In EZTag plan view you now have the possibility of viewing Web Maps (Google Maps, Bing, etc.) created using the Mobile File Manager. If you want to overlap your own shapefiles to the Web Maps, you will need to reproject them into the projection called Web Mercartor. In this article we will cover how to do the reprojection step using QGIS. |
|
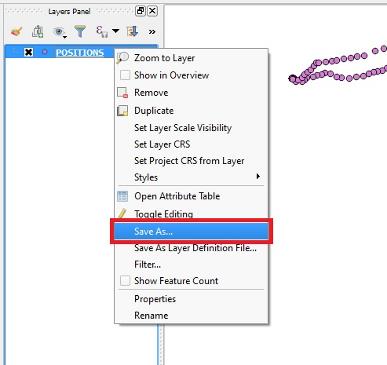
4. Right click on the layer from the Layers Panel and select Save As…; |
|
How to reproject using QGIS |
|
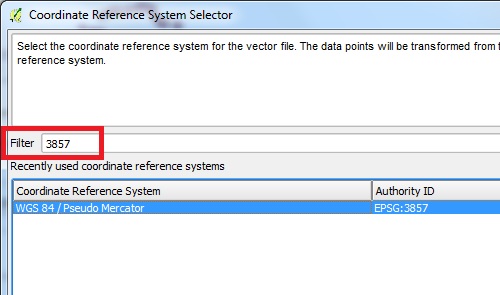
6. In the new window, type 3857 in the Filter box to find the needed system called “WGS 84 / Pseudo Mercator”; make sure to select it in the Coordinate Reference System box. Press OK to accept the choice; |
|
Article: 000139 Related Products: EZTag CE, OnPOZ Tools Last Update: 2017-05-17 15:03:39 |
|
Document information |
|
|
|
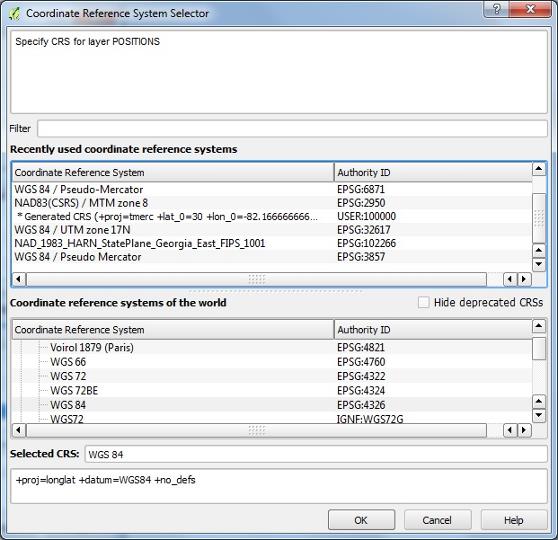
Note: If the coordinate system is already defined in your input layer, this window won’t necessarily show up. We recommend that you check the layer Properties to make sure the right Coordinate Reference System is selected. |
|
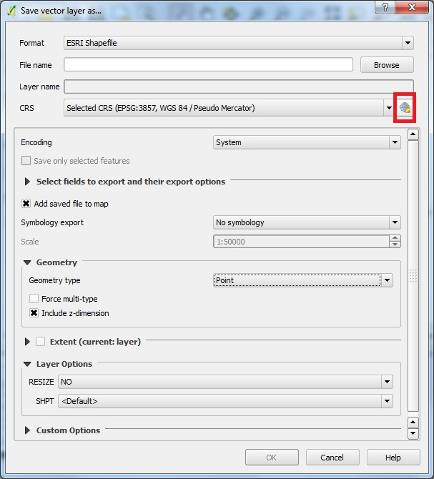
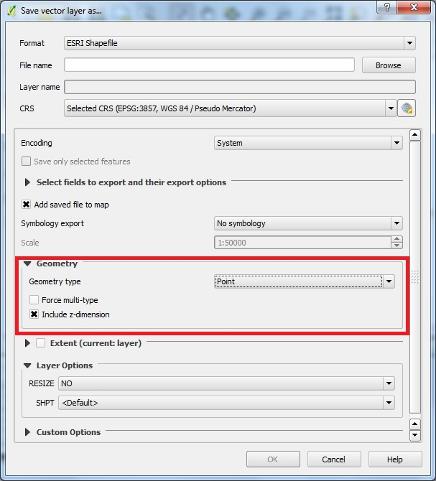
5. In the Save vector layer as… window, enter a new File name. The most important thing here is to select the right CRS; to do so, select the icon found at the end of the CRS list box; |
|
7. You are now back in the Save As window and the Web Mercator coordinate system you just selected is now visible. The last step is to change the Geometry to match your input file. If the shapefile you’re reprojecting contains points, select Point from the list; if it contains lines, select LineString and if it contains polygons, select Polygon. Please make sure to select the geometry matching your input file and not to leave the choice at Automatic. |
|
Once a valid new File Name is entered, that the CRS “WGS 84 / Pseudo Mercator (EPSG: 3857)“ is selected and that a valid Geometry are all set, press OK to create the new layer file. This layer will now be compatible with EZTag Web Maps. |
|
1. The first step is to make sure you have QGIS installed on your device. To download the free software, visit http://www.qgis.org/en/site/; 2. Open QGIS Desktop and import the shapefile you want to reproject; 3. If no projection definition is attached to the layer (the *.prj file), you will see this screen below appear. Make sure you specify your projection before proceeding to the next step. |