|
SurvCE data collection - Rover only |
|
When you collect field data with SurvCE, you have the possibility to post-process the project. Since there’s multiple ways to work with SurvCE, after finishing the survey you may wonder how to import the data in the post-processor. In this article you will find information on how to work with SurvCE with post-processing in mind. We cover the case of a user that collects Rover data in this article. |
|
Create a new SurvCE project for the rover and project setup |
|
Step by step instructions |
|
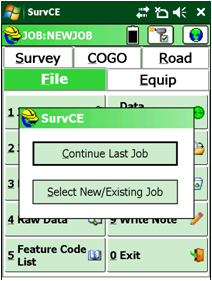
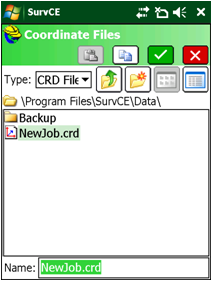
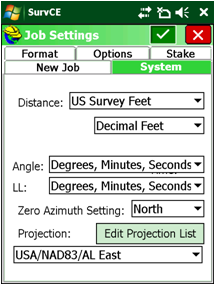
1. Launch the SurvCE on you mobile device; 2. Click on Select New/Existing Job;. 3. Enter a project name of your liking. The buttons located on top are useful for project manipulation (move, copy, change destination folder, etc.); 4. After accepting the project name, you will brought to the Job Settings page. From there select the System tab; 5. In the System page you’ll be able to set your preferred distance/angle unit and select or edit a mapping system. If the mapping system needed isn’t found in the Projection list, you can add it using the Edit Projection List button; |
|
6. Now that the job as been defined, you’re now ready configure the receiver you will using at the survey. Use the green checkmark button found on top of the page to accept the job settings; |
|
Rover setup |
|
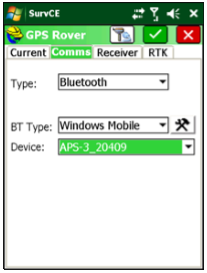
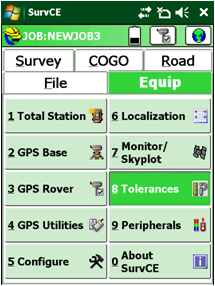
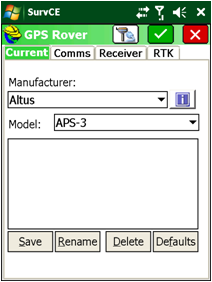
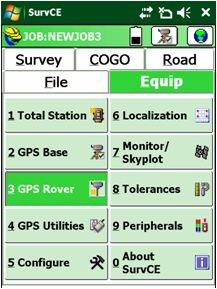
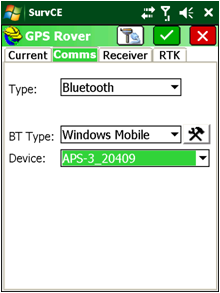
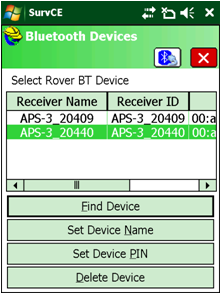
7. After setting up the project parameters, it is now time to connect to the receiver you’re using as a rover. If you followed the previous steps you should be back at the main page. From here select the Equip tab and select GPS Rover; 8. In the GPS Rover window, select the correct manufacturer and model for the rover. Go to the Comms tab when ready to pair with receiver; 9. Select the correct Type of connection. If Bluetooth is selected, make sure that you power on the receiver and press on the Tool button which brings you the Bluetooth Devices screen; 10. The Bluetooth Devices screen lets you do general operations regarding the Bluetooth devices. To pair the base station receiver, select Find Device, select the correct device in the list and, if needed, Set Device PIN. Once the pairing is finished, select the green checkmark to accept the settings; |
|
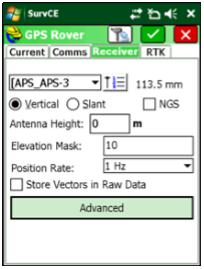
11. Back in the GPS Rover window, select the device you’ve just added in the Device list. Next select the Receiver tab; 12. From the Receiver tab, enter the information relative the antenna and the wanted recording rate. The last tab found on the page, called RTK lets the user configure the RTK link. We will not be exploring it in this article. Please refer to the SurvCE documentation for more details. When done, select the green check mark to accept the settings; |
|
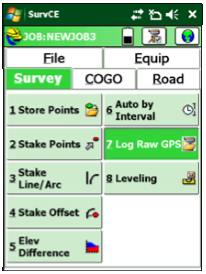
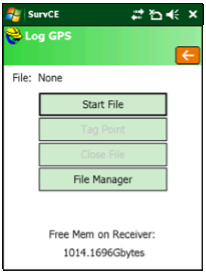
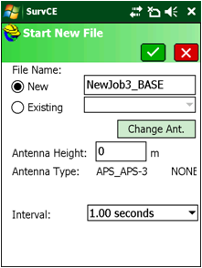
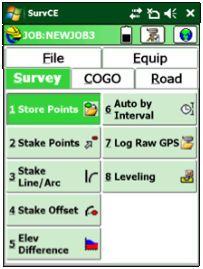
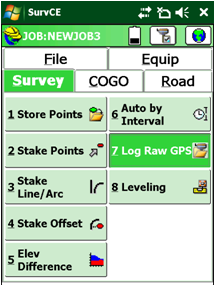
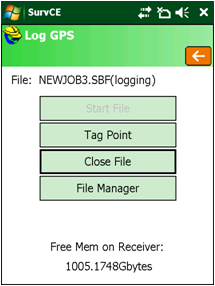
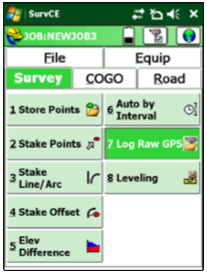
13. The next step to configure the rover is to begin logging the raw data file. From the main menu, switch to the Survey tab; 14. From the Survey page, select Log Raw GPS; 15. In the Log GPS, select Start File; 16. Select New in the Start New File window and enter a file name. This window also lets you review the antenna setting entered earlier; |
|
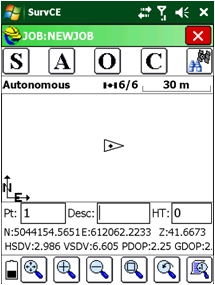
1. From the main menu, select the Survey tab; 2. In the new page, tap on Store Point; 3. From this window you can start to collect points. Here is a description of what the buttons found on top does.
· [S] button: This button lets you collect a one epoch point. · [A] button: Collect a average points. After selecting this option, you’ll get to the Average GPS window. From here you can set up the way you want to do the averaging (by number of epochs or by time). Other practical options are available from this window (tolerances for example). · [O] button: Create point offsets. · [C] button: Opens the general configure window.
Repeat this as you want to collect features; |
|
Collecting features |
|
4. When you’re done collecting features, you’ll need to stop the raw GPS logging. For the base a simple shutdown of the device is sufficient to stop the recording. From the Store Point window, click on the red [X] button; 5. From the main manu page, press on Log Raw GPS; 6. In the Log GPS window, select Close File. |
|
After the survey |
|
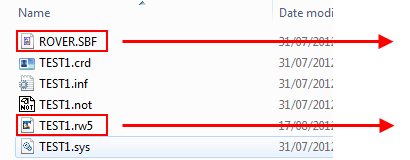
Once the survey is completed, after transferring the data from the Mobile Device and the receiver’s SD card, you might wonder what files you need to import into the post-processor. Make sure that you transferred the correct files and that they are all gathered together into the same folder like it is presented in the image below. You won’t have any issues importing your survey files into the post-processor if you follow these indications. |
|
Note: File names given here are for demonstration only. They will vary depending on the receiver you’re using and how you named your project. |
|
Project file from the data collector. Import this file in the post-processor to process your rover with the base collected on the field. |
|
Article: 000131 Related Products: EZSurv Last Update: 2016-12-23 18:36:26 |
|
Document information |
|
|


|
Receiver binary file (or RINEX files) from the rover receiver will be automatically imported after importing its respective *.rw5 file. |
|
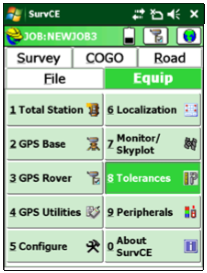
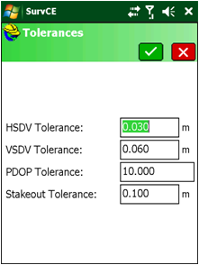
17. The last step to configure your rover is to modify the tolerances used on to define the data collection. Select the Equip tab; 18. From the Equip window, tap on Tolerances; 19. In the Tolerances setting page, you’ll find parameters that will define the minimum condition to start a feature collection; Here’s a description of the tolerances found here: · HSDV Tolerances: Minimum horizontal standard deviation to consider an epoch as valid. · VSDV Tolerances: Minimum vertical standard deviation to consider an epoch as valid. · PDOP Tolerances: Maximum 3D position dilution of precision to consider an epoch as valid. · Stakeout tolerances: This specifies the maximum difference between the target location and actual staked point. When the staked point is beyond the tolerance, SurvCE displays a warning dialog. Important note: If you are working only in Post-processing (no RTK corrections), input large value for these tolerances in order to be productive. |
|
20. You are now done with the rover configuration. Press the green checkbox to accept the settings and return to the main menu. |