
|
EZField - Configure Alarms |
|
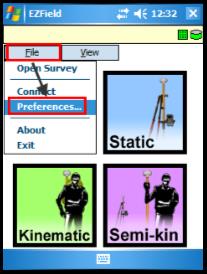
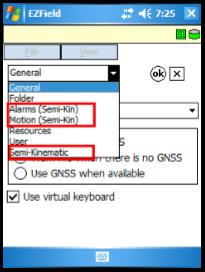
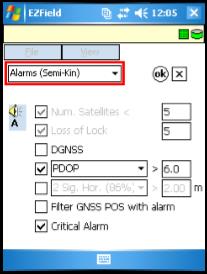
4. Some GNSS quality alarms are available; they are relative to the survey type selected (Base, Static, Kinematic or Semi-kin) a. Select the Survey Type (click on one of the four icons); b. Select File > Preferences; c. For each type of survey, three new preferences pages are available: Alarms / Motion / and the selected survey type; d. Select the Alarms page to set a couple of quality alarms; e. Check the boxes corresponding to the alarm and, if needed, edit the values in the text box; |
|
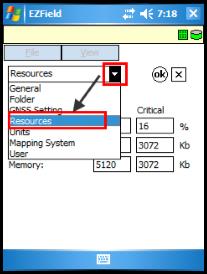
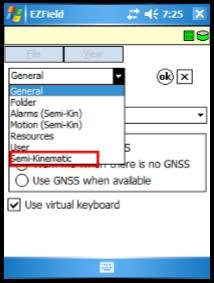
How to configure alarms in EZField 1. On your Mobile device, start EZField found under the Start menu (or Start > Programs); 2. Select File > Preferences; 3. Using the dropdown list, navigate to the Resources page where you can set alarms regarding the mobile device battery, disk (storage) and memory levels. |
|
An alarm in EZField will give the user a warning but it is not a filter.
The user should match their alarms with the EZSurv cutoff settings or with the Export Features filters in order to scrap the data recorded under alarms.
When recording data in Kinematic or Semi-kin mode, the alarms are taken into account. This translate into the fact that the data will not be recorded until minimum GNSS conditions are met. If you record a site (point), it may take longer to record since only good data (not under alarms) are part of the site. |
|
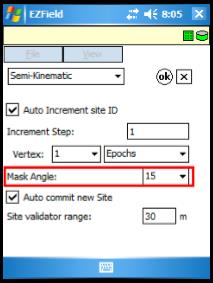
i. Once Motion is configured, use the drop-down list to select the “Survey Type” page (Semi-kin in this example); j. For all survey types, this page allows you to configure the Mask Angle; |
|
In this example, the horizontal accuracy alarm was set to
Therefore, the status bar circular accuracy value is highlighted
The Hor. Accuracy alarms is set for the data being recorded on the field (at the time of recording). If you post-process your data, its accuracy will increase at post-processing. The status bar does not indicate the post-processed accuracy (it shows the real time accuracy). Remember that the Hor. Accuracy alarm is usually used by people operating in real time or RTK mode. |
|
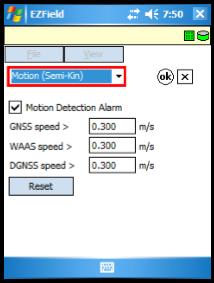
f. Press on the icon in shape of a speaker for more options; g. Once your Alarms are configured, use the drop-down list to select the Motion page; h. Check the Motion Detector Alarm box if you want the user to receive an alarm when he move while recording a site, a point or a polyline vertex; |
|
The Hor. Accuracy alarm is usually used by people operating in real time or RTK mode since only real time accuracy is available on the field. Post-processing accuracy is not available while surveying.
GNSS POS filter allows to filter the GNSS POS file. This file includes all GNSS positions (A.K.A bread crumbs; positions taken every few seconds depending on the data interval). This position file does not includes your sites, points, lines or polygons data (the TAG file does).
The Critical Alarm is louder and indicates one of the following: ■ A valid GNSS position cannot be computed; ■ Lost of communication between the mobile device and the GNSS receiver; ■ The Resources have reached a critical level. |
|
The speed values are relative to the GNSS receiver brand.
The default values should be correct; they are relative to the sensitivity of each type of receiver supported by the application.
If movement is detected while recording a site or a point (a message will warn you) but you’re not moving, it’s an indication that these values need to be reviewed. |
|
You will get an alarm if not enough satellites are above the mask angle (relative to the value entered under the Alarms page, Num. of Satellites). Setting a mask angle allows the software to ignore satellites at low elevation (data received from low elevation satellites are lower in quality).
The Site validator range provides an alarm warning to avoid site (or point) naming mistakes. It is available for the Kinematic and Semi-kin survey types. Example: You record site 1, then you record site 2 If site 2 is within the Site validation range, you get a warning to confirm site name. If you visit a site twice (for Quality Control purpose), you need to use the same Site name (the site validator may be useful for such case). |
|
5. The status bar indicates (highlights) any conditions that do not meet your alarms requirement. |
|
k. Once all your quality alarms are configured, press ok to save your configuration; |
|
Article: 000086 Related Products: EZField Last Update: 2016-07-14 18:44:15 |
|
Document information |
|
|